Remove "Police or Justice Department Ransomware virus"

STEP 1:

Download and burn "Hiren's BootCD" into an optical disk.

1. From another computer download "Hiren's BootCD" .

( Hiren's BootCD Download page: http://www.hirensbootcd.org/download/

Scroll page down and click on "Hirens.BootCD.15.2.zip" )


2. Right click on "Hirens.BootCD.15.2.zip" file and extract it.


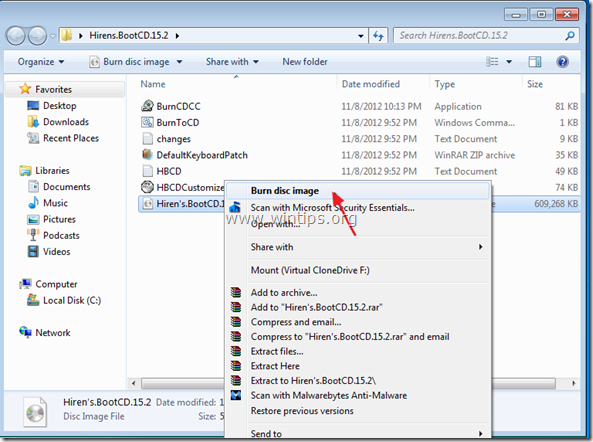
3. From inside "Hirens.BootCD.15.2" folder, find the "Hiren's.BootCD.15.2.ISO" disc Image file and burn it to a CD.


STEP 2:

Download RogueKiller.

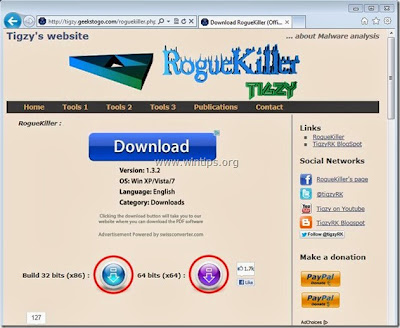
1. From the same (clean) computer download and save "RogueKiller" utility into a USB flash drive.

NOTICE: Download version x86 or X64 according the infected operating system's version if you remember it, otherwise download both versions to your USB flash drive.


STEP 3:

Boot the infected computer with Hirens.BootCD.

1. Take the CD out from the clean computer and insert it on the infected ‘s computer CDROM drive.

2. Restart (Reset) infected computer and boot from CD/DVD drive (Hiren's CD).*

NOTICE: First make sure that CD/DVD Drive is selected as first boot device from inside BIOS.

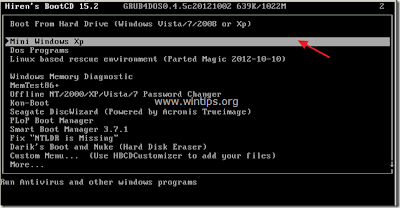
3. When the "Hiren's BootCD" menu appears on your screen, use your keyboard arrows keys to move into the "Mini Windows XP" option and then press "ENTER"


STEP 4:

Clean malicious entries (items) from you computer with RogueKiller.

1. Plug the USB drive into the affected computer.

2. From inside "Mini Windows XP" environment, open Windows explorer and from USB drive, find & double click to run RogueKiller.

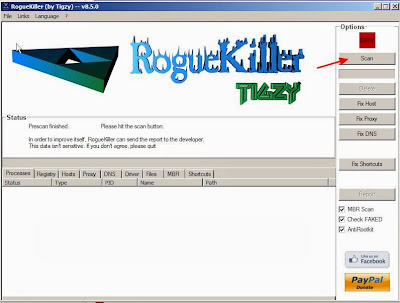
3.  Let the prescan to complete and then press on "Scan" button to perform a full scan.


4. When the full scan is completed, press the "Delete" button to remove all malicious items found from Disk C:\..

5.
Close "Rogue Killer" and remove Hiren's Boot CD from CD/DVD drive.

6. Restart infected computer (normally you should to log on to Windows without lock problems).

7. From inside Windows run "Rogue Killer" again to repeat the scan / cleaning procedure and make sure that all malicious entries are gone. If malicious entries are found delete them immediately.

8. Restart your computer and continue to the next step.


Malwarebytes


  Remove "Police or Justice Department Ransomware virus"

How to set out of office in outlook 2010

Set out of office with Out of Office Assistant using Exchange Account

If you are using an Exchange account, you can auto reply a specified message for the received emails with setting the Out of Office Assistant while you are away. Please do as follows:

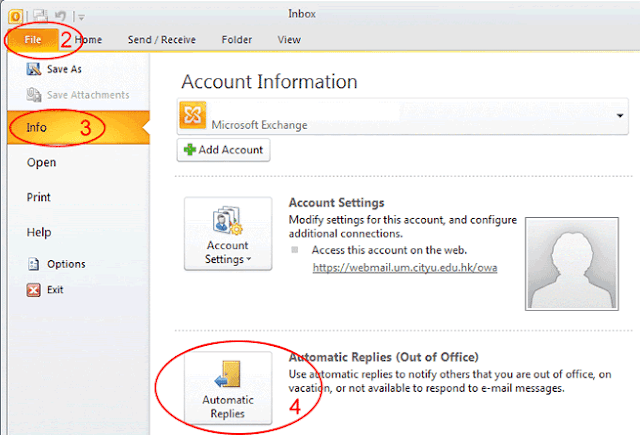
1. Click File button in the upper-left corner in outlook 2010, and click Info > Automatic Replies, see screenshot:

If you do not see this Automatic Replies option, your outlook have not connected to an Exchange Server.

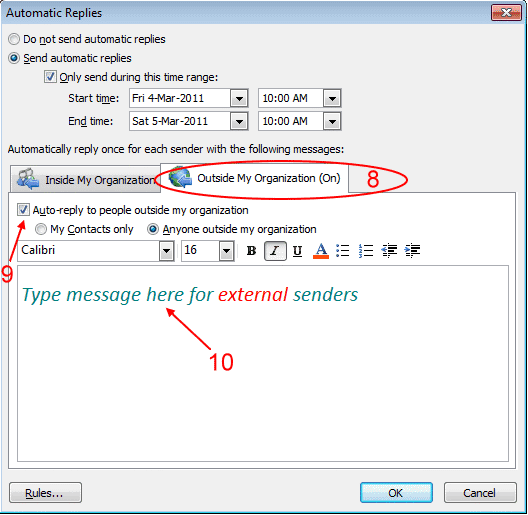
2. In the Automatic Replies dialog box, select the Send automatic replies:

    [1] Check the Only send during this time range, and then specify the Start time and End time you need to auto reply the message.
    [2] Then type your message at the space box.


3. If you want to send auto-reply message to external senders, click on the Outside My Organization tab and check the Auto-reply to people outside my organization option. See screenshot:


4. Click OK to activate the out of office message.

Set out of office with Out of Office Assistant using Exchange Account

If your outlook haven’t connected to an Exchange Server, the above method will not work. In this situation, the Manage Rules & Alerts function of Outlook can help you to set out of office auto reply as following steps:

1. Click Home > New E-mail to create a new message, type the subject and message as you need. See screenshot:


3. And then click Save to save the message.

4.
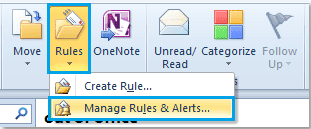
Then click Home > Rules > Manage Rules & Alerts, see screenshot:

5. In the Rules and Alerts wizard, click E-mail Rules tab, and select the email account that you want to apply the out of office setting from Apply changes to this folder, and then click New Rule.

6. In the Rules Wizard, click Apply rule on message I receive from the Start from a blank rule section.

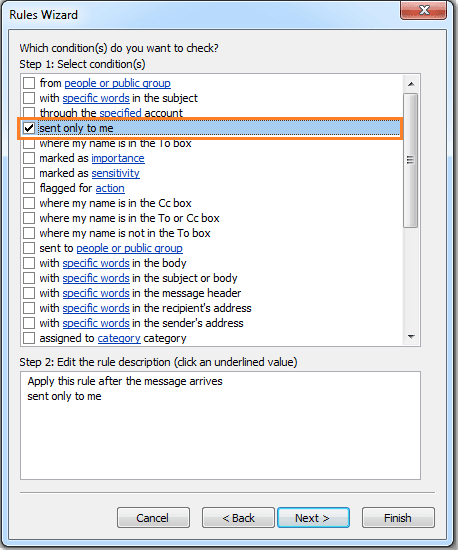
7. Click Next button, check sent only to me from Which conditions do you want to check?


8. Go on clicking Next:

   
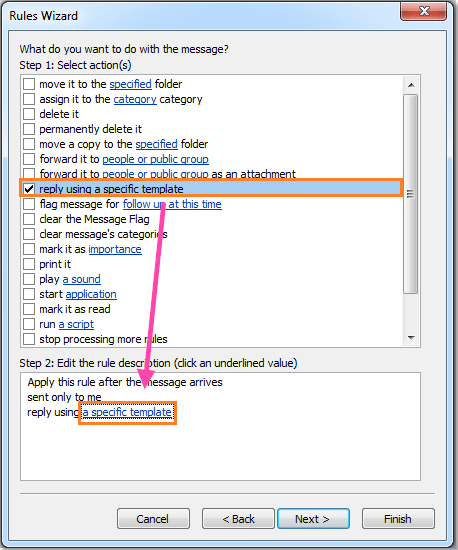
[1] Check reply using a specific template from What do you want to do with the message?
   [2] Then click a specific template hyperlink in the Edit the rule description section.
   [3] And a Select a Reply Template dialog box will appear, select User Templates in File System from Look in drop down list, and then click Browse button to choose the folder that you put the auto-reply message, and the message you created just now have been inserted. Then click Open to finish this step, see screenshots:


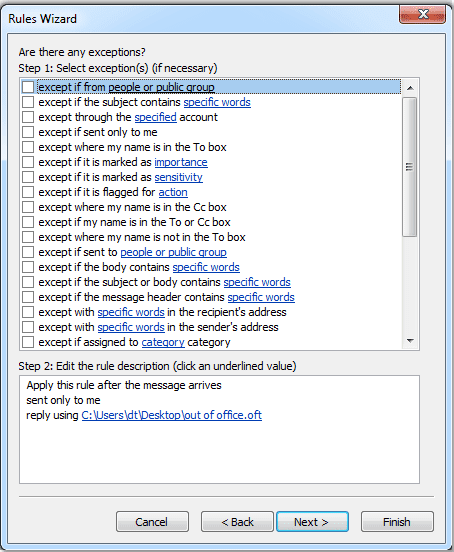
9. Go on Next, in this Are there any exceptions step, you needn’t check any item.
 

10. And click Next, enter a name for the rule in Step1 section, and specify the rule options as you need in Step2 section.


11. And then click Finish button to finish setting this auto reply rule. And when you receive some emails next time, the Outlook will reply them automatically at once.


Set out of office with Kutools for Outlook using any Accounts

The above method is somewhat troublesome and tedious for you to set them step by step, it test your patience. But here I will introduce you an easy and handy way to set out of office quickly and conveniently.

Kutools
for Outlook: with more than 20 handy Outlook add-ins, free to try with no limitation in 45 days. Get it Now.

If you have installed
Kutools for Outlook, please do as this:

1.
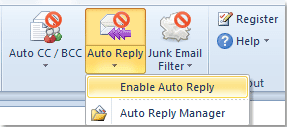
Click Kutools > Auto Reply > Enable Auto Reply to active this option.


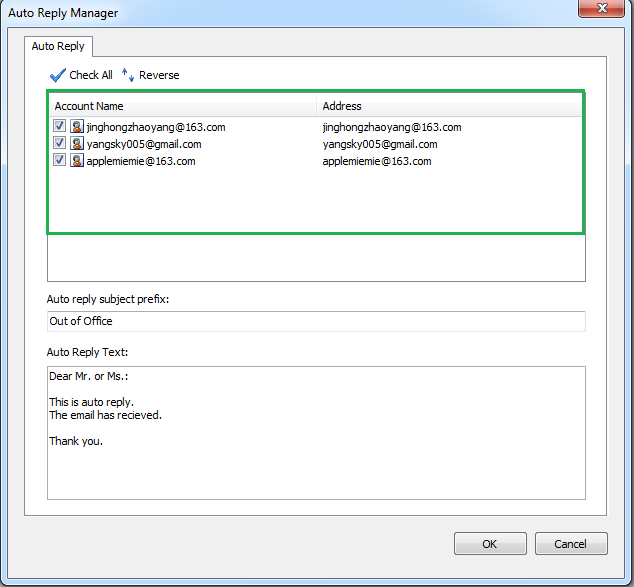
2. After turning on the Auto Reply function, and click Kutools > Auto Reply > Auto Reply Manager to open the Auto Reply Manager. 
In the manager, please check the Account Name that you want to apply this function. You can also edit the subject and auto reply text as your need. See screenshots:


 3. Then click OK button, the auto reply setting has been successfully set up.

NOTE:
If you want to turn off the Auto Reply function, you just need to click the Enable Auto Reply, and the Auto Reply will be in the closed state. See screenshots:


OFFICE 2010


How to set out of office in outlook 2010

OpenPGP Support in Outlook 2007-2010-2013

Outlook is the product offering in Microsoft’s Office productivity suite that allow power users to manage their email on their desktop. Basically, it’s a powerful email client. Many users do not even have a need for Outlook or Thunderbird because one can also manage their emails via their web browser. For example, to manage your Gmail account, you pretty much just log into Gmail’s web page. Reading, sending and sorting email is all done within the browser. Outlook mainly shines in businesses and enterprises that deploy their own email infrastructure. Anyways, chances are good that if you are looking for a way to integrate OpenPGP into Outlook, you know exactly what Outlook is. So with that being said, let’s just get started!

If you are testing this entirely by yourself, you will need two separate email accounts and preferably, two separate computers as well. For my testing purposes, I made two dummy email accounts called Test01@gmail.com and Test02@gmail.com.

The lab was between Outlook 2007 & 2010

The utility that allows Outlook to use the OpenPGP system is called the Outlook Privacy Plugin. The unfortunate part with this utility is that it only supports a single email account within Outlook.
For Outlook 2007 & 2010 i used Beta-2 and for Outlook 2013 Beta-34

Finally, we need GNUPG installed on our system. For Windows systems, the best way to do this is to install Gpg4win. Be sure to download the full version and not the lite version. The full version includes Kleopatra, which is the utility we use to manage our keys. It is certainly possible to manually manage your keyring but trust me, it’s not fun.

When you open Outlook after installing the Outlook Privacy Plugin, you’ll be presented with the plugin’s setting dialog box. It needs you to tell it where you have installed the Gpg.exe program. Gpg4win installed this for us and so we just need to browse to the correct location. By default, the location is located in:

C:\Program Files\GNU\GnuPG\pub


Here, I am assuming you do not have a key pair. Therefore, I’ll go over how to create one and attach it to your email account in Outlook. This process involves using the command prompt but it’s really easy, trust me. What you need to do first is open a command prompt with administrator privileges. Next, navigate to the directory where the gpg.exe executable is installed. I’ve listed the location above.

COMMAND PROMPT: 
What you need to do first is open a command prompt with administrator privileges. Next, navigate to the directory where the gpg.exe executable is installed. I’ve listed the location above.


Now we can create our key pair. If you enter in the exact commands as shown here, everything should work as expected. First we enter in: gpg --gen-key


For general uses, it’s best to just select the first option (RSA). Type in the number 1 and hit Enter. You’re then asked to select a key length for your key pair. Technically, the longer the keysize, the more secure it is although it takes more processing power to encrypt and decrypt. I typed in 1024.


  You’re then asked for the validity period for your key pair. If you are positive that you can keep your private key safe, you can set a longer validity period. For my test scenario, I chose my key validity period to not expire.


Next we need to fill in our personal information. First up is our Real Name. Of course you don’t really have to give your real name but if you are to use OpenPGP for business or professional purposes, you want the other party member to be able to correctly and easily identify you via your public key.


Next is your email address information. Here, you must give it the real email address you wish to associate with the generated key pair!

Finally, you can type in a comment. This usually gives a bit more information as to who you are. This field is purely optional.


One you hit Enter, you will be asked to confirm your entries. You can easily change the information by pressing the corresponding letter (N to change Name field, etc). Once you are finished, type the letter O to proceed.


A “pinentry” dialog box should appear. Here you will need to type in your secret passphrase to protect your private key. You should always remember this passphrase because it is how you access your private key to help decrypt and sign emails! You should also make it relatively strong.


Once done so, gpg will then proceed to generate our key pair. Here is the final output screen.


Now that we have our keypair generated for our email address, we need to next export our public key so that we can share it with other people. Whenever someone wants to send an encrypted email to you, they must use this public key which of course you give to them ahead of time. You can also send your public key to me for testing purposes. To export our public key, we type in this command:

gpg –export -a “youremailaddress” > test01.asc

This command will export our public key to a file called public.asc. We can then give this public key to any who wishes to communicate with us securely. In my scenario, I will simply transfer it to my USB thumb drive and import it to my second computer.


Now that I have my keypair for my first dummy email account, I need to repeat the same procedures for my second dummy test account. In the end, I will have a public/private keypair for both email accounts. Of course, this is only a test scenario and so that is why I had to perform this procedure twice. In the real world, you only generate the keypair for your own email account and not that of others!

I am now on my second computer and will proceed to import the public key I exported earlier from my first dummy account to my second computer. This is similar to what you will have to do when you receive a public key from another individual. You will have to import the key into your keyring before it can be utilized. Luckily, Gpg4win includes a nifty key management utility called Kleopatra that will make this whole import/export process very easy to perform. Here, I will perform a import.

Once I have Kleopatra opened, it will show you every key in your key ring. Here, you can see that I only have one key and that is the public/private key pair for my second email account, Test01@gmail.com. I am now going to import the public key for Test02@gmail.com.


I simply click on the Import Certificate button, browse to the certificate location and that’s it! The certificate for Test02@gmail.com will then be successfully imported into the key ring and it will be listed in the “Imported Certificates” tab.


At this point, we are almost ready to begin sending encrypted emails with Outlook. 
We just need to configure one more thing.
Back in Outlook, we need to set one more configuration setting for the Outlook Privacy Plugin and that is to tell it which private key belongs to us. Within Outlook, click on the Add-Ins tab and you will see the mini toolbar for the plugin.


Click on the Settings button and then select the Compose tab. Under the Default Key selection box, we should see our newly created private key. In my case, this would be my first email account of Test01@gmail.com. Select it, hit OK and we are done!


After that you must trust the others certificate
You can do that from Imported Certificates right click on the Certificate and click "Certify Certificate"


Select the Certificate [ in my case Test02@gmail.com ] select [ I have verified the fingerprint ] and then click Next.


Leave default options [ Certify only for myself ] and click Certify


Now the Certificate is on your "Trusted Certificates"


Sending Encrypted Email

Finally, we are able to test the encryption system by composing encrypted emails! This test is very simple. I will be composing a email from my second email account [ Test02@gmail.com ] to my primary account [ Test01@gmail.com ] using its public key. Sadly, we currently can only compose plain text emails using this system. HTML emails are not supported at the moment. Within Outlook, I press and hold down the Shift key while clicking on the New Email button. This lets Outlook know that I am composing a plain text email. I compose my email as usual. However, before sending, I select both the Sign and Encrypt setting located in the upper right corner.


By signing the email, this proves to Test01 (the email being sent to) that it was indeed Test02 that sent the email and no one else because the signature can only be decrypted using its public key. By encrypting the email with Test01′s public key, we can be sure that only that recipient is able to read the email because only that party member have the corresponding private key to decrypt the public key. When I hit the send button, the plugin will ask me for the passphrase for my private key (Test02). This is because I am signing the email which in turn needs access to my private key. You do not need to type in a password if you are only encrypting the email. You just need the recipient’s public key. Once done so, the email will get sent along its way!
When you receive the email only you have to do is to Decrypt the message from the same menu